
Superior Wilderness Designs Superior 40 Backpack - Initial Impressions
Ohhhhh boy am I excited for this one!
Applying vintage colors and some texture makes this modern pack looks great! ha! Who wouldn't want to put this bad boy on for a few days of hiking?
After having Brandon from Superior Wilderness Designs (SWD) on the podcast, we got to talking about how I needed to go full in on trying an ultralight pack. Brandon kindly offered to build me a pack to my desired specs in exchange for my honest feedback about how the pack performs. We agreed that in order to this to be an honest review process, I'd need to have the room to run with my thoughts and he agreed that was indeed important.
I realized however, that some of the feedback I might have with gear could be caused by me not understanding the design principles and decisions made by the manufacture. So, with that said, I promised the fine folks at SWD that if I had any gripes, I'd run it by them first for comment and include those in these reviews.
So here's the plan; I'm going to do a few of reviews about this pack and my experience with it. The first one is the initial review, then a midterm review, and eventually a longterm review. I think it's important when doing a review of such a key piece of gear, that the review be done in a series. If you're up for that kind of thing, keep reading!

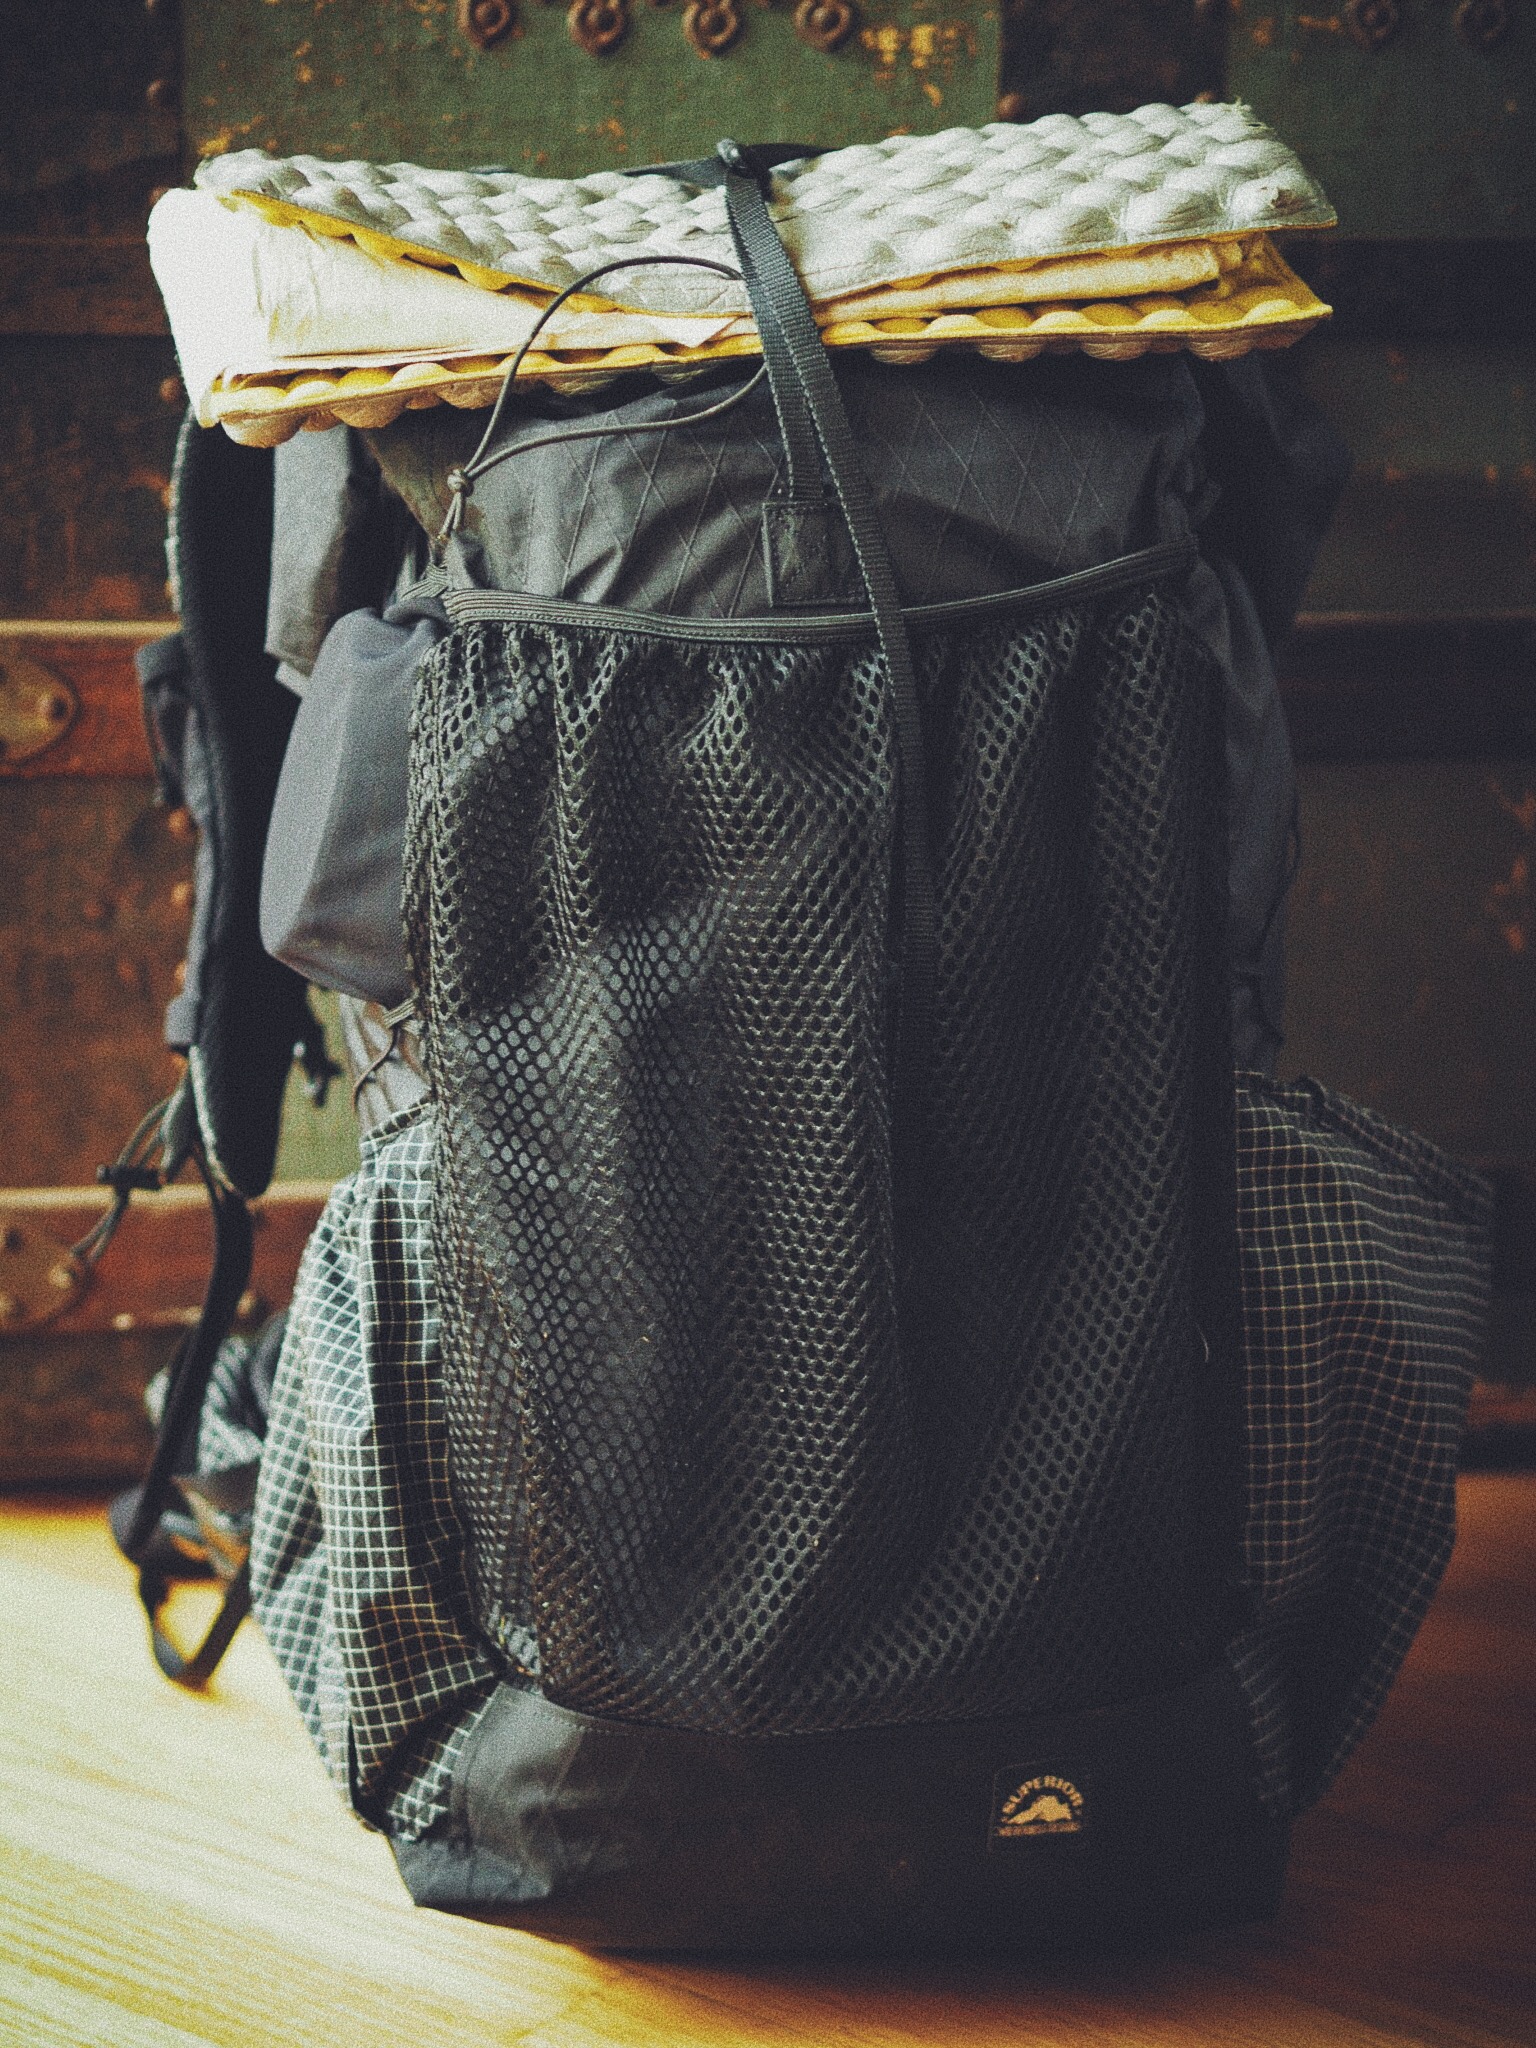
Hand written tag that comes on each pack stating the weight and name. Nice touch!
***Scroll down to the bottom of the post for additional pictures and my Q and A with SWD***
Customization
What's cool about SWD is that their packs are made to order to the customer desires. If you don't like something about a pack, you can pretty much have them adjust it from the start! How cool is that? You essentially take a base model of a pack and add in or take away whatever you heart desires. Don't want a frame? Done! Want a custom color? Done!

If I have a waist belt, I'm going to want pouches. They fit my iphone 7plus by the way.
The simple fact that you can create the pack you've always wanted in itself is worth taking a look at what SWD offers. If for some reason you want something done that you don't see available by the company, just shoot them an email and ask about it.
Decisions to Make
After talking it over with Brandon, I settled on the Superior 40 (for 40L) because I wanted to focus on streamlining everything in order to reduce overall pack weight. Too much space in a pack means you're at risk of putting things in there you don't need. I was looking for a pack for 1-5 day adventures that would pack down small, but give me some space for food as I needed it.

Another option I had added was this upper stretch pocket. I used it for camera filters and it worked great!

I chose my colors and options, one of which was this shoulder strap pouch. It coms in handy!
We went through the pack design together and I picked out what I wanted and what I didn't. I chose the following;
Upper side stretch pocket
Roll top clips on the sides
Aluminum stays
Hip belt pouches
Shoulder strap pockets
Front mesh pocket made out of a netting type fabric instead of stretch
This was hard for me...Brandon encouraged me to try NOT using stretch fabric as it's less durable than the mesh. It was a mental hurdle to get over and I'm glad I did!
The color was black on black!
The standard fabric is X Pac
Side pockets made of X Pac
Load Lifters

Load lifters are now standard on SWD packs.

I opted to have my roll top secure via side buckles.
Initial Impressions
When the pack arrived, it came in a standard box that felt like nothing as in it. I picked it up and thought "oh man...this is light!" Of course I immediately opened it up and began looking it over.
Along with the pack came a little zip lock baggy with a sternum strap, some lashing for the back pocket, lashing for shoulder straps, and a sticker from SWD. I ran to the basement, grabbed some gear, and tossed it in the pack so I could feel how it felt. So far so good! It was very comfortable, but the real test comes after you're hiking for a few miles and the pack has time to get to know you.
Setting up the Pack
I mentioned above that the pack came with a zip lock baggy that contained various items for customizing the pack. When I pulled everything out I was a little confused at first as to what I was looking at. It took me a minute to realize one of the items was a sternum strap and the others were for the back of the pack (more on this later).

Up close look at the load lifters. They provide just enough help to prevent the pack from pulling back.

Additional items to be used as you see fit.
Prepping the pack

The beauty of a roll top! Need more space? No problem!
I had a trip planned for this pack right out of the box. A 3-day trek around Mount St. Helens would give me ample time to get to know what I was working with. I decided that for this trip I wouldn't adjust a thing on the pack until afterwards so I could understand what I liked and didn't like. For the remainder of this post, I used the pack AS IS from SWD with no personal adjustments.
Packing up
There's something really freeing about having a simple backpack. The Superior 40 has one main body with a roll top enclosure, two side pockets, and a front mesh pocket. When there's limited options on a bag, you are forced to really think about what you're doing, where to put things, and how to access them.
Contrary to popular belief, you don't need access to everything all the time. It's only at the end of the day that you really need EVERYTHING. Thus, the beauty of an ultralight pack like this one. You are forced into be selective. It streamlines your process and un-complicates things.
When it was all said and done, I had everything I needed for 3 days and 2 nights in a 40L pack with 2 liters of water, lots of food (probably more than I needed), and a bunch of camera equipment. I weighed my pack before I left the house and found it was just under 25lbs.. Considering this pack is rated up to 35lbs, I feel like I had plenty of room to add more food or more camera gear without tipping the scales. My base weight (just necessary gear) was around 13lbs and that's without really TRYING to cut weight.
Do you know how amazing it is to toss a 25lbs pack on for a backpacking trip? It's amazing! Your life becomes so much better on trail and the things you think you'd miss when you're at camp you really don't miss at all. With a 13 lbs. base weight, I was as happy as ever and wanted for nothing.

Grab handle.

Over the top compression straps for attaching things such as a seat pad.
On Trail
**Spoiler Alert**
My hike around Helens was cut short due to wayyyy too much snow. After we broke for lunch, I looked at my friends and said that we'd better just bail now or risk having a super crappy time on the backside of the mountain where there is no quick way to get out of there in the event someone hurts themselves post-holing. I'm not a huge fan of taking unnecessary risks, so when I'm falling into chest deep holes and falling over all the time, I cut my loses and bail.
Attempted hike around Mount St. Helens with the Superior Wilderness Designs Superior 40 backpack
Continued...
With that said, while I didn't get to do a full 30 miles with the pack, I sure as hell got a workout in with it! Hiking uphill through snow is a challenge and doing so with a pack that doesn't ride right or is hurting would make life that much harder.
I have good news to report though; Not once did I think about the pack being on my back. That might sound bad at first, but to anyone who's hiked with a pack that gives them pain, it's a beautiful thing. The last thing you want to do when trying to enjoy yourself is be concentrating on how much you're uncomfortable.
Uphill, through deep snow, down hills, through the brush, and in the bright sun, the Superior 40 did not disappoint. It didn't pinch me anywhere, rub me raw, make funny noises, or irritate me in any manner. In fact, it felt like it was glued to my body the whole time.
When I would fall into a hole, I didn't feel as though my pack was making matters worse. When fitted and sized properly, it fits like a glove. Now, for some that can be a bad thing if you're the type that gets overheated from having something on your back all the time with less than optimal airflow, but for me, I didn't experience anything like that.
My first 30 mile trip with the Superior Wilderness Designs Superior 40 backpack
Ventilation on the back

Details on the lumbar region. Nice and comfy.
I was concerned at first that the pack fabric, being waterproof and all and sitting so close to my body, would cause me to overheat and sweat too much, but that didn't happen. I recall one time thinking my back was warming up, but anytime I would take my pack off, I never felt that cold breeze feel when your back is soaked. Somehow, my back remained at a good temperature even when hiking in the high 70's low 80's over open terrain and exerting myself over snowfields.
Crossing snow fields and sliding down hills
To anyone who's ever had to worry about waterpoofing your pack, know this... the fabric that SWD uses is called X Pac and it's great. It's fully waterproof, and even though it's not seam sealed at the stitch lines, this thing is darn near water tight. I was in snow all day sliding down hills and falling all over the place and not once did I worry about my items getting wet. Sure, it wasn't raining, but if it had been, I still wouldn't be worried. Unless it gets dunked in a river, I really don't see there being an issue with weather saturating my things.
To be honest, I personally wasn't looking forward to the X Pac fabric for really dumb reasons. I thought it looked cheap and plastic like, but once I had my hands on it and saw it perform, I'm sold on it! It's lightweight, waterproof, and looks to be durable.

Attachment bits for strapping bottles or, in my case, a small Joby Tripod.

Mesh versus stretch fabric. Far better durability.
Durability

iphone 7plus fits in the shoulder pockets.
I had plenty of opportunities to puncture holes in this pack on this trip. I was pushing through brush and falling down all the time and each time I took my pack off, I looked for rips and tears. I saw none.
At this point I'm not sure how much abuse the fabric will take, but it seems as though it's doing a great job so far. I'm not super careful with my gear, but at the same time I'm not hard on it. I like my gear to hold up to me being tired and slinging off my pack wherever. For that purpose, it seems to be doing just fine!
Function
I mentioned before, but I really like the simplicity of a pack like this. Anytime I thought I might have a problem with something, it turned out not to be the case. For example, I thought that the waist belt might be annoying by not having the easy pull style buckle on there, but it wasn't. I also thought the mesh versus stretch fabric would bother me, but again...it didn't. I thought that having my back tight up against the X Pac fabric would cause me to overheat or sweat too much, but on this trip, it didn't.
Overall, the function of the pack was great and I'm really looking forward to using it again.

A simple buckle that actually works really well for how small it is.

I like the tiny logos on the packs. This guy is located on the back.
Sewing and overall product quality
I don't know much about sewing, but I do know about how a product appears to be built. From what I can tell, SWD does a fine job of sewing their gear. The way I see it is the sew quality seems to be on par with something being sold at REI, but again, I'm not a stitching expert.
Nothing I saw on the pack screamed "oh, this is from a cottage company." The craftsmanship is solid and everything looks to be very well done in my opinion. I'd have no problem at all suggesting someone look at purchasing one of these packs.
Final Thoughts On my initial impressions
I'm not going to pretend that I've put a thousand miles under this pack or even a few dozen. I still have many miles to hike under my Superior 40 before I have an opinion based on extensive experience, however I will say that I am incredibly impressed with the customer service, options, craftsmanship, and overall design of these packs.

X-Pac details.

Side compression via lashing.

Shoulder strap details.

Buttons on the roll top.
I love that you can essentially create your own personal pack based on your personal style. The price is fair and from what I've experienced thus far, the Superior 40 is as comfortable as they come.
After a botched trip through snow, I'm extremely excited to put more miles under this pack!
Okay...I know you're thinking "but Emory, it can't all be good." You're right, nothing is perfect, but here's the thing... because these packs are customizable, you can pretty much fix anything you like when you order a pack!
Q and A with SWD
I mentioned before that this is not going to be a one-sided review. I wrote my questions and feedback down, sent them over to SWD, and received their feedback in my feedback. Below you'll see my comments and their responses.
Before we jump in, I wanted to offer this initial response from SWD that was a huge piece of enlightenment for me. Because I'm not the maker of the pack, I don't have the insight that they do for what the design principles are. When I sent in my feedback to SWD, they responded with some great answers and the following comment;
“The main idea with the packs so far has been to keep them as minimal as possible, then being that they are made to order, we can easily add whatever features people want when we are making the pack. Then based on feedback and requests, we have tweaked and fine tuned the packs from there.
We always tend to use a food analogy there. Think of the stock packs on the website as a plain cheese pizza, and you can either just go with the plain cheese, or add other toppings. Then once we get enough requests for something you can add specialty pizzas to the menu that already come with certain toppings.”
Not only is this a great initial response, but who doesn't love pizza?!
Side Compression
Side view of the SWD packs.
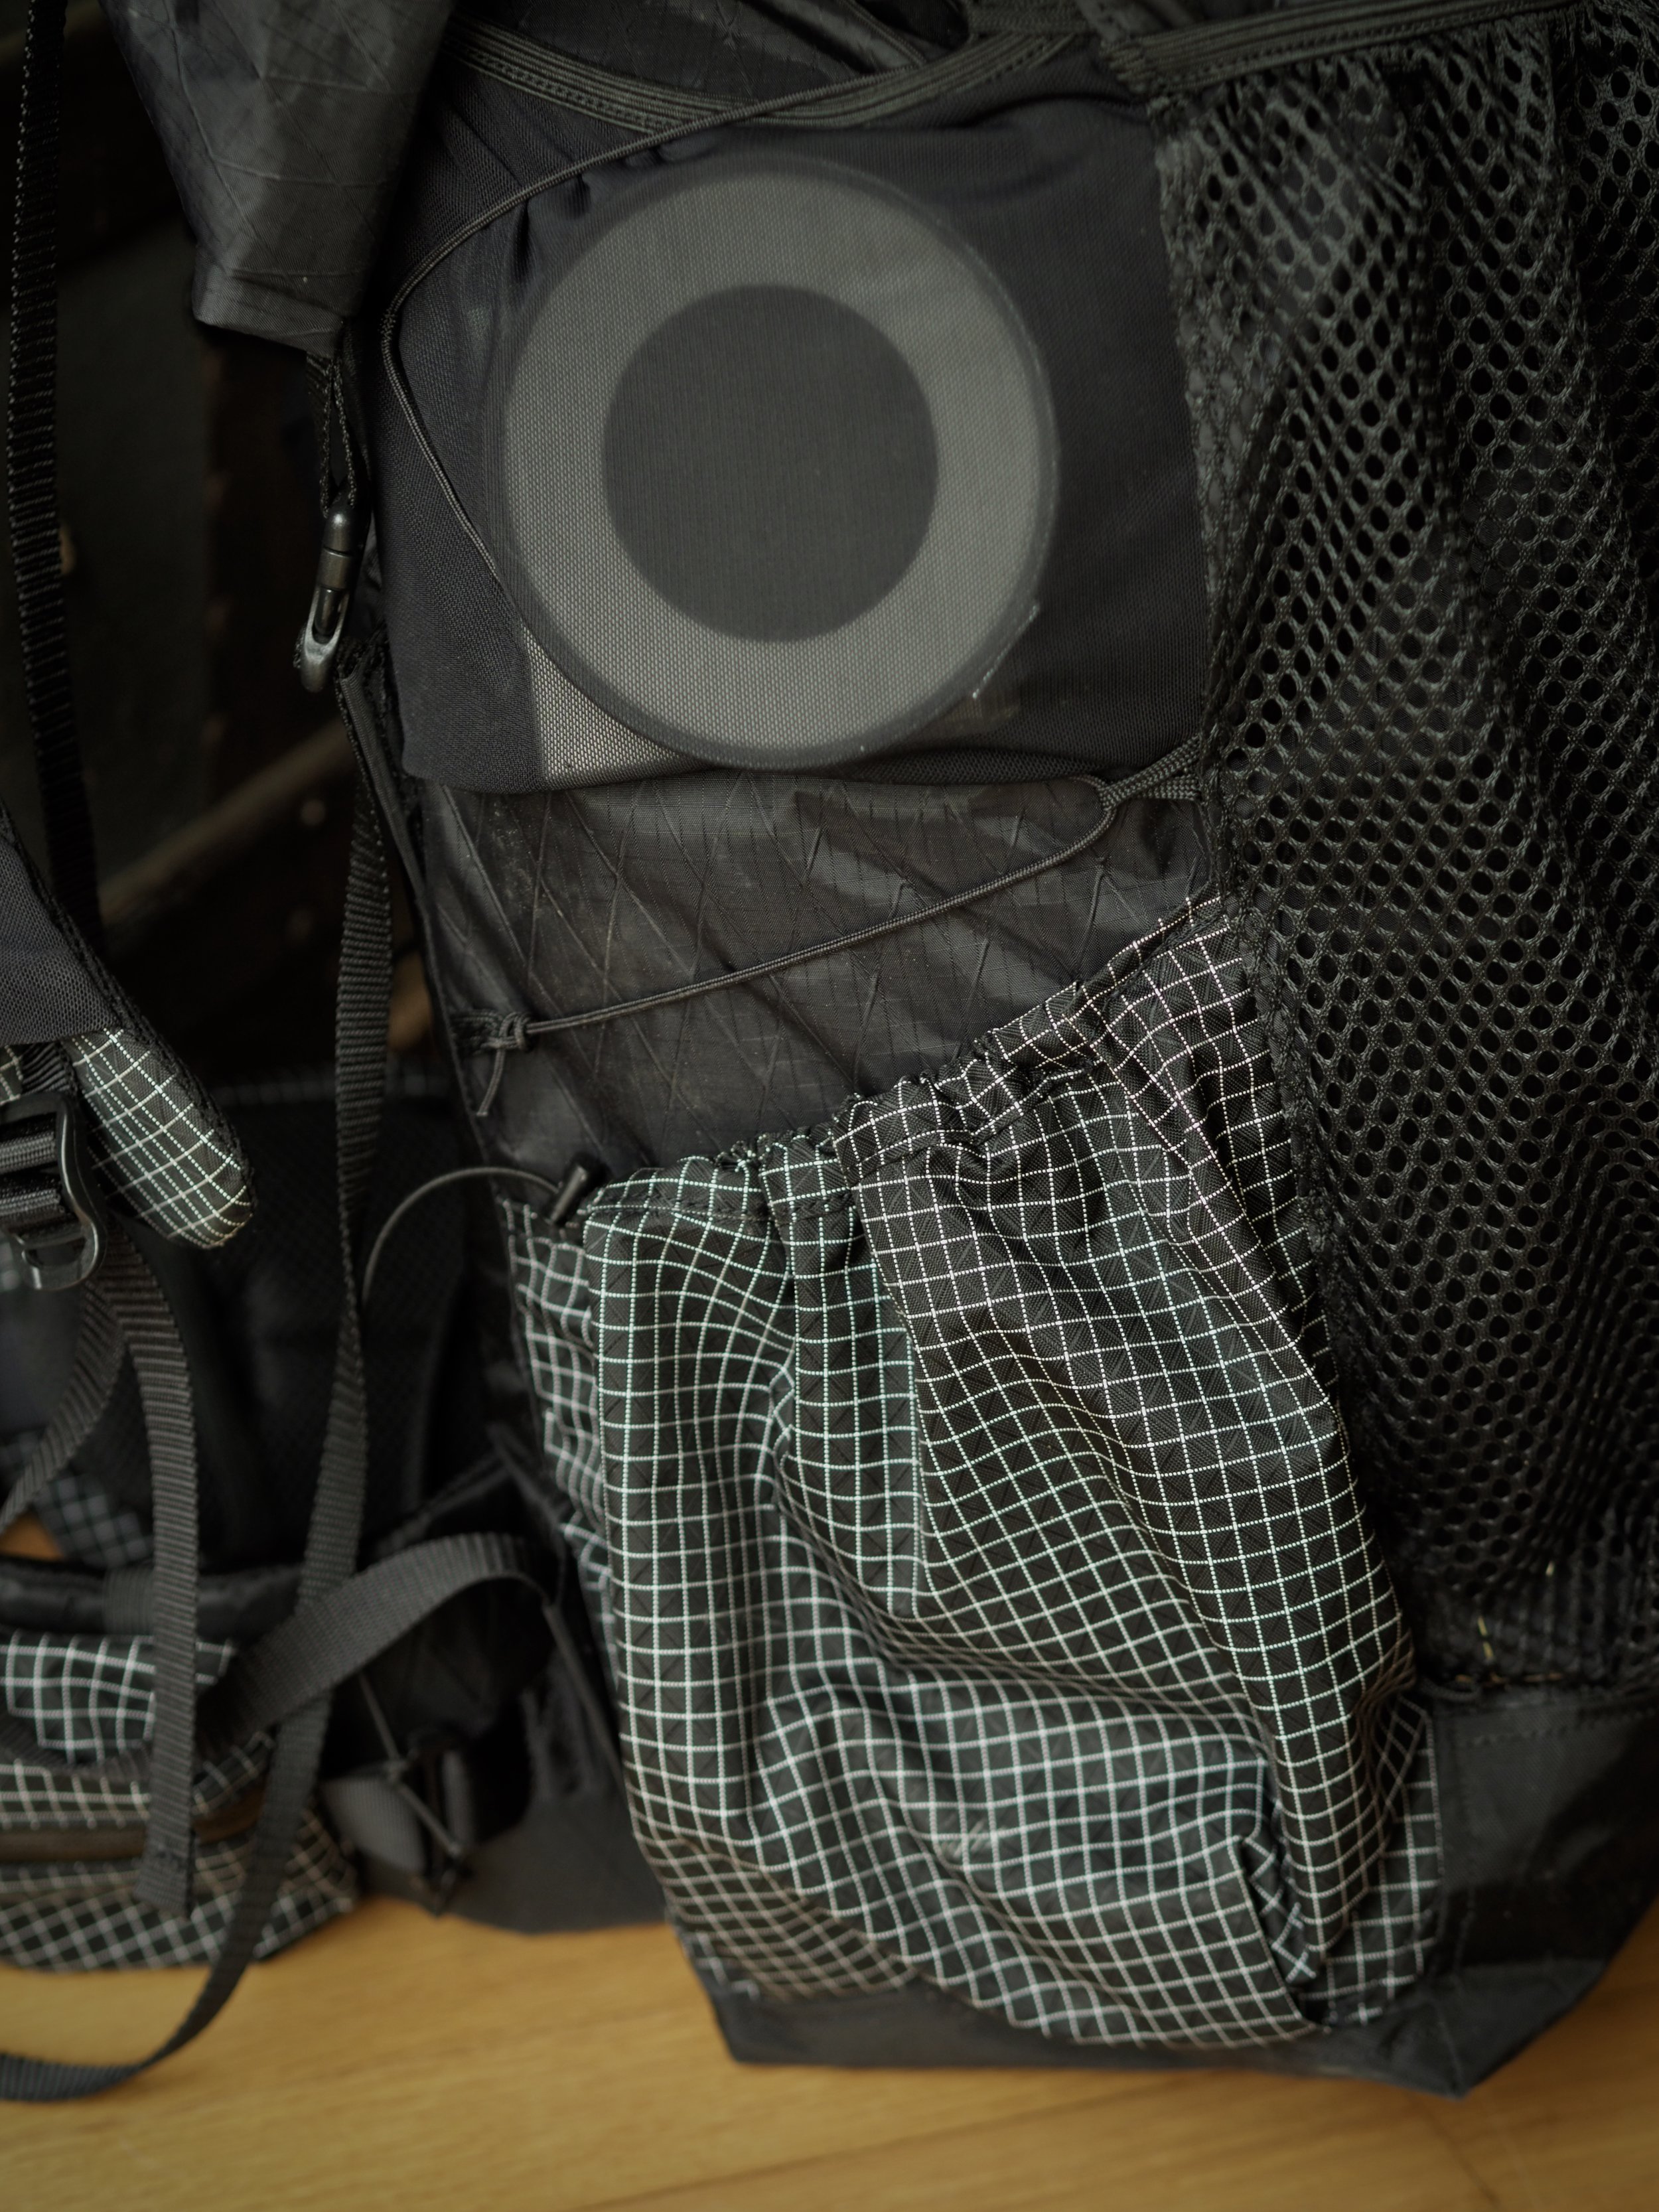
I didn't find the compression straps on the side to be very useful or effective. They kind of weave from the bottom of the pack up to the top to a draw cord that when you pull on it, it compresses the top of the bag leaving the bottom pretty much untouched. I'd prefer to either not have compression in a pack this small or maybe choose to have one or two independent compression points that can be used on their own or not at all. The cordage on the current set up kind of just gets in the way in my opinion. Additionally, the upper stretch I had chosen to go with is impacted by these compression straps weaving all over it rendering it kind of difficult to get into. Again, I'd almost just prefer not to have the compression.
***SWD Response***
"We have come to the same conclusions you have on the side compression. Basically its only necessary when carrying really small loads (to compress the bag), so we chose to keep it really minimal. Its also totally removable, even the plastic hardware is just attached using a larks head knot, so it is removable as well. We recently started putting two line loc adjusters on, one at the top where yours is located, and one on the very bottom. This makes it easier to tighten the bottom. It also makes it more modular as you could cut up the cord and rig up the side compression any way you want to."

Upper stretch pocket.
Hip Belt Pouches
I'd like to see an option for integrated hip belt pouches. The ones that came with the pack work fine, but the OCD in me doesn't enjoy seeing the straps fall off the end of the hip belt when they become loose. I like my gear to be secured nicely and the only thing that is keeping the hip belt pouch in place, is a piece of webbing that the pouch secures to. This is a nice feature to have if you want to remove the pouches from time to time, but if you're like me, I'd just prefer to have an integrated option available so I can minimize straps and buckles.
***SWD Response***
"We are fans of modularity, hence making them removable. If we started to get enough requests to have the pockets sewn on we could be swayed though."

Removable hip belt pouches.

Pouches are secured in place by this hardware so it doesn't slip off.
Side pockets
I chose to go with X Pac for my side pockets, but I think if I had to do it over again, I'd choose a stretch fabric. The reason is that X Pac is really smooth and doesn't really secure anything to it. The way SWD has it designed is they have a draw cord at the top for securing items to. In a sense, this is really nice because you can loosen it up or tighten it as you see fit, but I personally just don't want to deal with that. I found that my water bottles slipped out of my pouch easier if I bent over with the pack on or fell in a hole. On one occasion, I did actually fall in a hole and while I was rolling out of it, my water bottle slipped out of the pocket and into a tree well a few feet down. Because the X Pac fabric is so slick and the only tension on the object inside is the draw cord at the top, things tend to slip out.
To fix this you have a couple of options. You can either create longer pockets on the side or change the material used. My choice would be to change the material to a stretch fabric so that there is tension on that object all through the pocket versus just the top where the cord is at.

Side pockets.

Large drawstring side pockets.
***SWD Response***
"We have never found a stretch fabric that even comes close to the durability of solid fabrics like x-pac or the dyneema gridstop, so it is hard to sew them into a pack knowing they will wear out well before the rest of the pack, especially in a higher abrasion area like the side pockets.
We have had mostly good reviews on side pockets, and most people don't seem to have issues with them. We have had a couple people say the same thing as you though, so maybe that is enough to warrant making them slightly bigger.
If we do go that route, we would most likely just extend the tall side of the pocket up about 1-2". This is a bit of a tricky area, as you try to make sure the pockets are as easily accessible as possible, but also tall enough so that things won't fall out."
Bag of Accessories
I mentioned in the beginning of the post that there's a bag of accessories that comes with the pack. In the bag is a sternum strap, shoulder strap cords, and a lashing for the back of your pack. It's a little confusing at first knowing what those are for and how they are supposed to be attached to the pack. I'd like to see SWD include a short instruction manual for where those items go and how to attach them.
***SWD Response***
"For the optional items, leaving them off allows us to streamline the shipping process a bit more. I did make a sternum strap attachment picture that I have been meaning to put up online (coming soon). "
Sternum Strap

Sternum strap location.
The sternum strap could use an adjustment on how it attaches to the pack. On mine, you have to loop the strap through a buckle which can be a bit of a pain in the butt. I know there are some quick attach hardware out there that could be used to replace this design. If you ever have to adjust your sternum strap on the fly or in the field it's going to get annoying because of how you have to weave the buckle. It's not the end of the world, but from a user experience point of view, it would be a solid improvement.
***SWD Response***
"For the sternum strap attachment, this is actually the lightest/easiest method I have found so far. I definitely haven't put a ton of research/thought into it, but I do like this method more than the other standard methods where you have to wiggle a piece of hardware onto the shoulder strap daisy chain. I'll keep this in mind and be on the lookout for some different hardware though."
Lashing on the back of the pack
In that accessory bag came a long piece of cordage meant for attaching to the back of the pack. I still haven't attached it because either I'm lazy or I don't want to figure out how to do it (again back to the directions part). Even if I did want it, I'm not sure I'd get much use out of it because of how it's designed. When installed, it's meant to kind of lace up the back of your pack and since the cordage is stretchy, it keeps things nice and secure (I think). My only thought here is that I don't know what I'd use that kind of lashing for. I'd much prefer to have two horizontal and non-stretchy bits of lashing stretched across the pack that I can tighten down when needed to hold something like shoes or a jacket. If this were an option during the build of the pack, I'd probably prefer that over the lacing up of stretchy cordage.
***SWD Response***
"We could definitely do fixed straps for the front pocket lashing. We pretty much just always go with the lightest/easily removable options for features like this though. Then being that we do so much custom work, we just let people ask us when they want to add something like that. We have done similar things in the past such as ski straps and whatnot, but we haven't had enough requests to justify adding the extra weight of sewn in straps as a stock option."

Roll top.

Roll top details.
Find out more about SWD at https://www.swdbackpacks.com/